The PermaDesign Weblog, with Nate Downey and Melissa McDonald!
Roof-Reliant Landscaping™ Step 17E: Water Storage - Cistern Placement
Cistern Placement
To help determine the best location for your cistern, a set of seven guidelines for cistern placement are presented below. These guidelines are intended to help save time and money, as well as to make your whole system as efficient and productive as possible.
While many cistern tanks are added to residential properties after construction of the house has been completed, in new construction cistern design and placement issues should be considered at the beginning of the design process rather than as an afterthought. Designing the cistern system as an integral part of the site can add additional options for cistern locations including within buildings and on a structure’s foundation.
1. Understand the Size and Shape of Your Tank
In Chapter 3, Sizing Your Cistern, we explained how to calculate the amount of water that can be harvested off your roof in a “normal” year. You were then instructed to multiply that number by one-third to get an approximate number of gallons
you might consider storing in your cistern. Knowing the capacity of your cistern enables you to calculate the overall dimensions of your tank. Start by asking your tank supplier what size tanks are available in the number of gallons you require.
Depending on the type of cistern material, this can often eliminate the need for you to calculate the dimensions of your tank on your own.
The dimensions of your tank are important for a number of reasons. First, you need to know how to get the tank to its desired location on your property. Some tanks need to be craned over trees and buildings, while others can slide right off of a truck and be rolled by one person to their proper place.
Second, there needs to be enough physical space available to excavate the hole and trenches. A backhoe, a big hole, piles of earth, the tank, tools and vehicles take up a tremendous amount of space. It is important to place your cistern so that it can be installed with ease instead of creating any extra cost and the potential for accidents and injury, which is another advantage to new construction and thoughtful landscape planning.
Third, being aware of the dimensions of your tank is useful if there is a chance you might hit bedrock or other materials that are difficult to excavate. Although there are tools for removing bedrock, this type of work can get loud, expensive and dangerous.
You will also want to know approximately how much your tank will weigh. The empty weight is important because moving such a large, heavy vessel from the street to your backyard requires planning for an appropriate crew and/or the proper equipment. Aboveground cistern system designers should also be aware of the empty weight of any tank that is being placed in a wind corridor, so that effective measures can be taken to prevent the tank from being blown out of place by New Mexico’s gusty winds.
2. Use Gravity
Let gravity fill your cistern whenever practical. Whether your conveyance system involves gutters and downspouts with little or no horizontal run piping or whether it uses funnel drains and long horizontal runs, your supply point should aim for the top of your cistern in such a manner that all conveyance piping will drain completely.
Avoid pump tanks whenever possible. These are separate, smaller cisterns used temporarily to quickly and consistently pump roof water to the system's main cistern. The additional pump, tank and float switch associated with this kind of system
complicates the project significantly and can increase the long- and short-term costs of a project unnecessarily (additional pump = additional electricity and more maintenance).
Be careful not to install underground cisterns any deeper than necessary. This mistake can appreciably increase the excavation and dirt-removal costs of the project. In addition, the labor and material costs associated with conveyance piping, sediment traps, overflow piping, vent piping and distribution piping will rise. Also, some tank materials may not be ableto withstand the extra weight of the earth that will be backfilled onto a tank that has been installed too deeply.
Ideally, the proper placement of your cistern with respect to gravity could provide enough water pressure for your drip irrigation system. Most people, however, have neither the necessary terrain nor the requisite patience to use gravity in this way.
3. Keep Conduit Lengths to a Minimum
Another very important factor in cistern placement is its proximity to your roof, the distribution system and the electrical utility. Unnecessarily long runs of these and any other type of conduit will add to the price of your project. Long runs require wire sizing and voltage drop calculations. Not only does this make the project more expensive to install, it can also create work later if the runs of pipe and wire are accidentally cut during future work in your garden.
Your cistern and its associated parts should be located in a place where they are easy to observe, maintain and fix. If possible, place your level reader, pump, irrigation clock and any other feature requiring conduit in one convenient place.
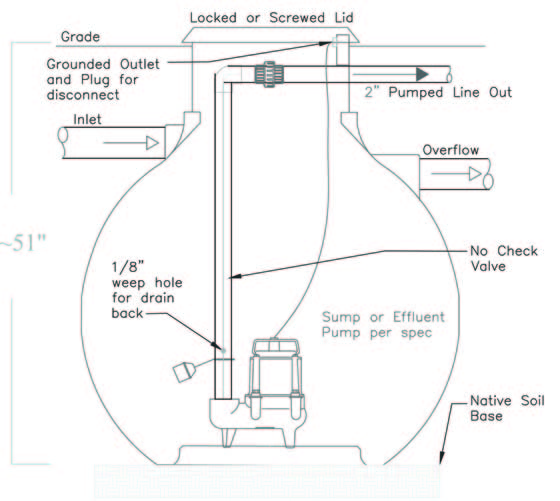
4. Situate Overflow Pipe in an Appropriate Place
The location of your cistern’s overflow pipe is critical when considering the placement of your cistern. In a properly designed system, excess water flows through an overflow pipe to a point called “daylight,” which is where any underground drainage pipe emerges to the open air.
Of course, the best use of “overflow” water is to irrigate plants, such as trees that can benefit from occasional deep waterings. To handle a large volume of overflow water, simple but essential erosion-control measures should be installed at your daylight point. Often a hole filled with gravel and a swale that pours gently into a mulched bed planted with a few shrubs or a tree works well. When flows are high and/or your slope is steep, riprap and/or wire-wrapped gabions might be required to prevent soil erosion at the daylight point.
Note that on flat properties your run to daylight will be longer than the overflow run on the typical steep site. However, the erosion-control work needed at the daylight point of a flat site is usually less extensive than the work that is often required on steep sites. Civil engineers, drainage contractors and/or appropriate government regulators will need to be consulted in high-volume, steep-slope situations.
5. Locate Your Vent and Serviceway Appropriately
Part of determining the location of an underground cistern is making sure that the vent and serviceway access can be inexpensively hidden from view. Sometimes this is reason enough to move a cistern from one side of a house to another. If everything else is equal except that the vent and serviceway to your cistern would be seen through a living room window, why not (during the design phase of your project) move the cistern to a less-prominent place?
For cases in which moving your serviceway and vents to a less visible place is impossible, here are a few tips for hiding these necessary parts of your cistern system. Since vent pipes have a theoretically unlimited horizontal run, they can usually be hidden at a relatively low cost around the corner of a building or behind some plant material. This work shouldn't be too expensive, but your cost estimate should include all five steps in the process: digging a shallow trench, laying vent pipe, fitting the pipe, backfilling over the trench and tamping the backfill until properly compacted.
For ease of access and to prevent debris and other forms of runoff from falling into cisterns, serviceways should protrude out of the ground. Some of the best ways to camouflage a serviceway are to install earthen berms, plants, decorative boulders, mulch and fencing. Remember to keep your serviceway locked when not in use to prevent injuries.
6. Synergize Your Cistern with Your Landscape
Consider the placement of your cistern in relationship to your landscape plan. The consequences of a poorly placed cistern can be serious, so make sure your cistern works not only with its collection, conveyance and distribution components but also with every component and feature of your roof-reliant landscape project.
Will your cistern and its associated components (such as its horizontal runs and its main distribution pipe) work with your landscape design? If at all possible, avoid placing your cistern in a place that prevents you from having some other important landscape feature. Try to place your tank in such a way that it improves your quality of life and increases your property’s value.
Where might the placement of your cistern help reduce the total cost of your landscape? Do particular placement options put constraints on the size of your tank and therefore shrink your water budget? Will the placement of your tank affect your installation schedule? The answers to these questions will help you finalize the decision about your cistern’s place in the landscape.
7. Get a Second Opinion
Once you have determined the best site for your cistern, it makes sense to get a second opinion. Ideally this opinion would come from a professional in the field, but second and third opinions can also come from acquaintances, friends and family. Given that inappropriate placement of your cistern could be the most costly mistake that you might make in this process, determining the most appropriate place for the heart of your roof-reliant landscape is critical.
02/23/2016 | (0) Comments


Comments